Hello Gamers!
I have decided to run a series of SYW games using Cartouche 2nd edition from Piquet Inc, featuring the Duke of Brunswick (leader of the Allied army in Germany) starting with the Battle of Krefeld, June 23, 1758.
I'm using the following sources for scenario ideas:
1. Tim Tilson Scenario book: Great Captains Campaigns: Ferdinand of Brunswick.(refights just the flank attack) available on www.wargamevault.com
2. Kronoskaf site: http://www.kronoskaf.com/syw/index.php?title=Main_Page
battle http://www.kronoskaf.com/syw/index.php?title=1758-06-23_-_Battle_of_Krefeld
3. Age of Honor scenario book (refights entire battle):
http://www.ageofeagles.com/Pages/ScenarioBooks.aspx
4. Volley & Bayonet Scenario book: Battles of the Seven Years War, Volume 2 The Strategic Flanks, Frank Chadwick (refights entire battle)
https://volleyandbayonet.wordpress.com/volley-bayonet-publications/
5. Operations of the Allied Army Under the Duke of Brunswick, 1757-1762, by Sir Charles Hotham-Thompson.
6. "His Britannic Majesty's Army in Germany during the Seven Years War" by Sir Reginald Savory
http://www.18thcenturypress.com/savory.html
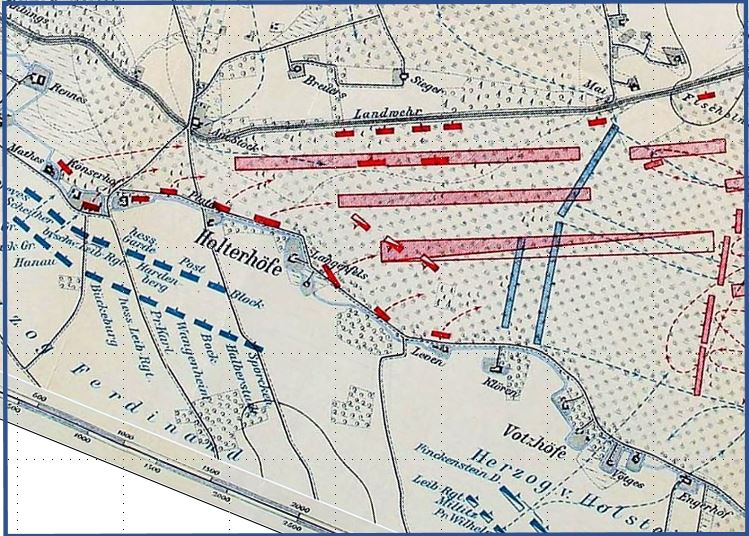
Here is the map I based my game on from the Kronoskaf site. Cropped and rotated. French are in red and Allies in blue.
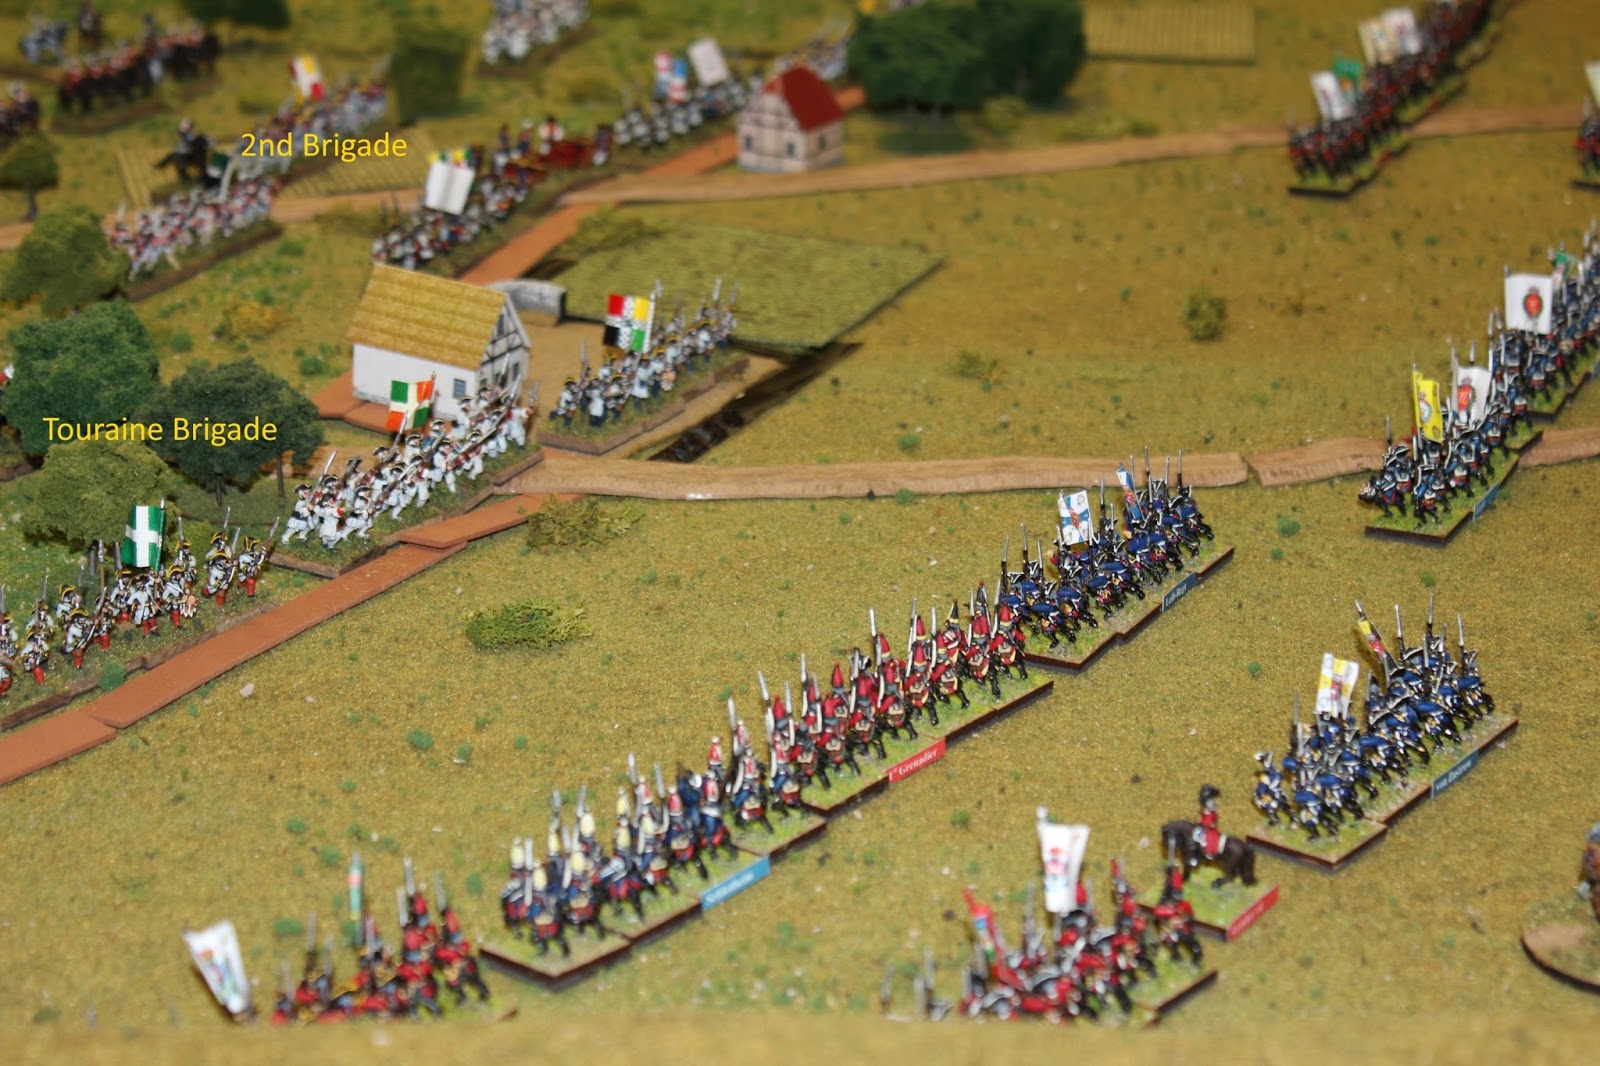
Here is the overview shot during setup from the Allied perspective.

From the French perspective.

Painting of Hessians during this battle fending off a French cavalry attack. I love this painting.

Scenario Rules for Piquet
1. We are only fighting the flank attack, as that was the majority of the battle.
2. The "Great Ditch" is CLASS III terrain. This is the brown strip of terrain between the two armies.
3. The Landwehr, cross section below is CLASS IV, should not be a factor in the game. This is the dark brown strip that is on the base edge of the French side of the table.

4. Allies roll a D6 and that unit, going from right to left, on the French front line is disordered from the Allied artillery fire that occurs before this scenario starts.
5. The scrub area where most of the French are deployed is CLASS II terrain for cover. Slows movement done by 2" (not half per normal rules), and no fire inside that area can be done at long distance. Only point blank to medium range applies.
6. French and Allied cavalry wings would come onto the table after spending 1 pip on Cavalry Move in Open card six times. This should mean that both cavalry units would appear on the table (French left flank) some point in turn 2. However, Piquet is not always fair, so the timing may vary.
7. Since the Allies are attacking they automatically win the first initiative roll and must go first.
8. We used the rule of 1/3 for impetus distribution. Winner gets all their normal impetus, while the loser of the roll gets 1/3 rounded down. Winner decides whether to use their impetus first or second.
Rosters
Here are some photos of the rosters, but if you want actual PDF files let me know and I will send them in email. Because I was focused on the flank attack only I used 1 for 1 battalions\regiments in this battle.
Allied Roster
Allies drew 37 Morale Chips

French Roster
French drew 29 Morale Chips

The Players
Allies (Hanoverians, Hessians, and Brunswickers)
Brian (2nd Brigade and 3rd Brigade)
Jan (1st Brigade and Cavalry Reserve)
French
Phil (Touraine Brigade and 2nd Brigade)
Eric (La Marine Brigade and Cavalry Reserve)
Rules: Piquet Cartouche 2nd Edition
Miniatures: 15mm Old Glory
Initial Thoughts
The Allies will have a tough assault. They have to attack an army that is deployed in cover (CLASS II) and they have to surmount the Great Ditch in order to cross bayonets with the French. The allied commanders will need to stomach heavy losses in order to persevere.
These initial photos are to familiarize you with the armies and terrain.
This is the view down the Great Ditch separating the two armies. You can see that I started the forces very close together so that a 2nd move by the Allies would put them in contact with the Great Ditch.

Major-General von Wangenheim's 1st Brigade of seven Hanoverian battalions anchors the Allies right wing and is squared off against the French La Marine Brigade of six battalions, with 1/3 of them being trained militia.

Major-General von Gilsa's 2nd Brigade of Hessians and Brunswickers. They will have to move the greatest distance to reach the French. The guns and The Duke overlook their advance.

Major-General von Kielmansegg's 3rd Brigade of infantry, including both the Hanoverian and Hessian Grenadier battalions. This is the hammer that will lead the assault and hopefully turn the French right flank. The Hereditary Prince is in the rear guiding his attack. In the real battle the Hereditary Prince attached himself to the Hanoverian Grenadiers and led the charge against the Great Ditch! Our local commander's didn't want to risk it for some reason and left him unattached, even though I gave them that option at the beginning of the game.

The French right flank (Touraine Brigade) readies themselves for the coming onslaught.
The Battle
The Allies rolled a 2 and the 2nd unit starting from the French right flank was disordered. This happened to be the Champaign regiment with the green flag!
The Allies win a nice amount of impetus to start and get an Infantry Move in Open card early which they use to move all three of their infantry brigades directly forward to the attack.
The Allied 3rd Brigade leading with the Grenadiers and the high quality von Scheither (far right) move into musket short musket range. The French Touraine regiment (unflocked gasp), in its first table top engagement opens fire and inflicts massive (3 stands) casualties on the first roll of the game! The von Scheither returns fire, but only managed 1 stand of damage. The Allies are already shaking their heads as they know this is going to be a brutal assault.

The rest of both battle lines exchange volleys with the Champaign regiment being forced back by the Hessian musket fire, while the von Scheither Hanover regiment is completely wiped out by the Touraine's second fire!

The Hanoverian Grenadiers then concentrate fire on the French Vaubecourt regiment and move into contact with the Great Ditch so they can assault on a Melee Resolution card.

Same situation from a different angle.

The Brunswick Leib-Regt also moves into support against the small german farm filled with French.

The French Royal Vaisseaux regiment was the only French unit deployed on the other side of the Great Ditch when the battle started. They valiantly withstood several assaults and close range fire. Even managing to drive back the Brunswick Leib Regiment.

Meanwhile on the Allied Right flank, Jan brought his command forward and was slowed a bit due to there being some CLASS II scrub on his side of the Great Ditch, but the French Alsace and Hanoverian Behr regiment go toe-to-toe exchanging volleys.

The Hanoverian Grenadiers assault the French Vaubecourt regiment and rout them from their position. The Grenadiers are the first to cross the ditch! French command of the Touraine Brigade has a "heart" next to him indicating he is vulnerable to becoming a casualty on the next Office Check card.

This view is a little further back so you can see the Allied 2nd brigade coming into action in the center against the French 2nd brigade.

At the beginning of the game, I gave each player a chance to swap locations of the units in their initial deployment so that some of the weak (rolled poorly on ratings) units could be moved into the second line rather than in the first line. This was not done by the Allies, so the two allied regiments that came through the light woods into the waiting muskets of the French were both rated poor (D8 fire, D6 melee, and D4 morale). The happen to run into the best rated (I rolled a 20 for their rating) French unit on the table the Royal Barrios. (D12+1 fire, D12 melee, D10 morale). The first volley of the Royal Barrios and Bouillon regiment shatter the Hanoverian Wangenheim and Sachsen regiments. Routing them both with morale checks!

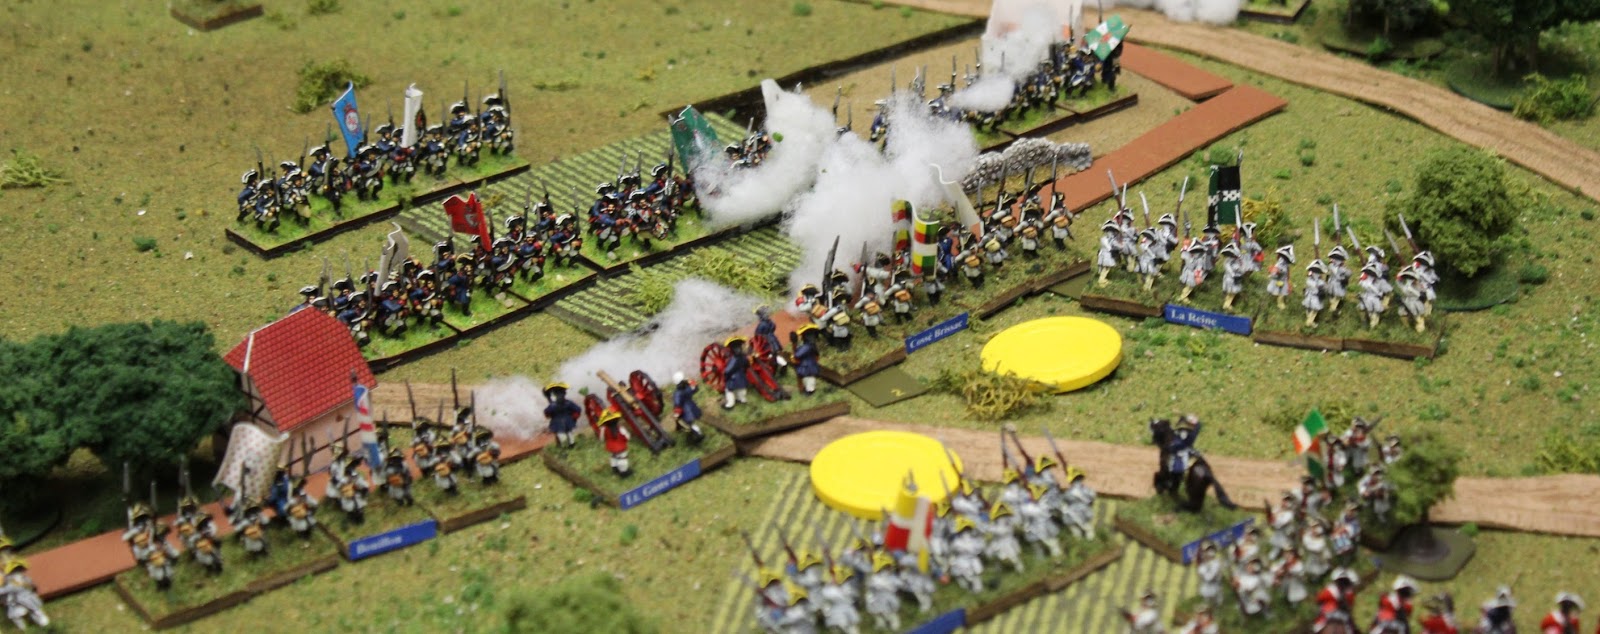
Good view of the entire left wing of the French defense. The yellow poker chips are Opportunity Fire chips, which allow the non-active player to fire at moving or firing active enemy units.

Meanwhile, Brian is not done using this Hanoverian Grenadiers with great enthusiasm! They assault the French Champaign regiment and ROUT them!

The French Touraine regiment, pinned to the front by the Hessian Grenadiers are flanked by the Hanoverian Reden regiment

By this time the French Touraine Brigade is rapidly disintegrate! Three of the five battalions are rounting and more pain is on the way!

The Brunswick Leib-Regiment has maneuvered onto the flank of the Royal Vaisseaux regiment and deliver a volley into its flank! This more than they can stand! They rout on the morale check.

The entire French right flank has collapsed at this point in the game. Four out of five regiments routed, with the lone Picardie regiment holding the flank. The French 2nd brigade and the Heavy Cavalry reserve has started to turn to the flank to protect it. Due to the terrain they may have time to shore up the lines.

Meanwhile on the French left, the Berwich Irish regiment is exchanging ineffective volleys with the Ahlefeld regiment, while the Behr regiment retires due to casualties, but the von Post moves into its place.

Now Brian brings in the Allied 2nd Brigade (mostly Hessians) against the French center. The Hessian unit with the red flag (Leib-Regiment) too devastating fire in canister range of the French light artillery and was routed. Opportunity fire all along the line.
Photos from Jan's point of view on the Allied right flank, with the von Post routing the Alsace regiment and moving across the Great Ditch.

The great push by the 2nd Brigade (Hessians) from the Allied perspective.

Here was the roll, the Hessian Mansbach regiment pulled the Melee Resolution card against the French Light Guns behind the ditch. The Hessians swarmed across the ditch into canister fire and were routed unralliable! The Hessians rolled a 1 on a D8, while the guns rolled a 4 on a D4.
This ended the game as the Allies were down to zero morale chips, while the French still had 4. Yes, the Allies could have fought onward, but it was a weekday night so we called the game at this point. The Duke of Brunswick had failed on the tabletop where his historical counter-part succeeded. The battle tonight had that same sort of gritty close, hand-to-hand conflict as the real life.
The Hessian Mansbach regiment charging across the Great Ditch!

This is the view on the Allied far left where you can see the complete breach in the French right flank. A single regiment awaits five. If the allies hadn't paid such a heavy price in casualties (morale chips) they were primed to drive the French from the field!

Final Thoughts
I knew this was going to be a tough battle and in the end the Allies had forced the Great Ditch and would have started rolling into the French reserves, but the cost was too heavy this day.
Brian (Hanoverian general), who normally rolls about average, rolled an amazing amount of 1s even on D12s. Yet, he was still able to clear the ditch of the entire Touraine Brigade.
Phil, who notoriously rolls below average, rolled out of his mind. Several 12s on D12. Sixes on D6 defensive rolls. He started the game with a 12 on a D12! "I fear I may never roll that high again", he was to say later.
Where was the cavalry wings? They never appeared. They were very close, and could have turned the tide.
We started around 7:30pm and ended at 10:00pm. A fierce engagement for 2.5 hours and we all enjoyed the drama and fun.
PS - my blog has crossed the 300,000 hits threshold, so thanks to all my friends across the globe that have dropped by for a visit!
Great to see classic Piquet in action
ReplyDeleteExcellent recap of the game! Wonderful to see all of those forces on the table!
ReplyDeleteGreat AAR, great looking game! And thanks for telling me of this battle. I work at Nijmegen, just across the border from Krefeld in the Netherlands, and never even knew of this battle, only 10 miles away! Just goes to show...
ReplyDeleteJust getting into the SYW so very timely post!
ReplyDeleteCongrats on the 300,000 veiws quite a milestone!!
Best
Willie
Nice figures and flags! I enjoyed reading about this battle. Old school Piquet, d20 vs d20, crazy fun.
ReplyDeleteA beautiful battle, lovely period and figures!
ReplyDeleteJust catching up to this wonderful battle report. Great looking troops and table, and a fine report!
ReplyDeleteThanks Peter! I'm working on my next post for an upcoming SYW battle. Should be another great battle!
ReplyDeleteHey There !
ReplyDeleteMy name is Joshua Stawiarski Co - Editor Of TalkWargaming.com
Sorry if this message is presented in a spammy way but it’s hard to contact a lot of wargamers properly.
I wanted to inquire about if you would be interested in selling published content you created that is on your website to us over here at talkwargaming.com as we are looking to diversify our content mix.
If you are interested or have questions we can go over more details at: editortalkwargaming@gmail.com
Put In The Subject Heading : “ Wargame Creator ”
Looking forward to hearing from you,
Sincerely,
Co - Editor Of talkwargaming.com