Saturday, August 29, 2015

3D Campaign Maps - Part 3

Well, the natural progress for these prototypes was to add rivers\water.

I decided to take a stab at a shoreline with a harbor based at the mouth of a river.

This is my first dual layer map with a blue (ocean\river) foam sheet below the standard green sheet.

I'm trying to see if this second sheet will add stability to the map.

Step #1 - I painted the back side of the blue sheet with Mod Podge glue to hopefully stop warping. (Not pictured)

Step #2 - I left the middle of the long side of the maps open for a possible river exit. In this sample, I have decided to make a 1/4 inch width (3 strokes of a Sharpie side by side) leading to a harbor, and an island in the harbor. Initial drawing below.
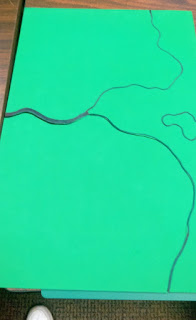


Step #3 - Use an Exacto knife to cut out the patterns. Here you can see the lower portion of the land south of the river, cut out.


Just tossed that lower half onto the beautiful blue water! I can already tell I'm going to love this.


Cut the rest out and took some more photos. I'm not going to glue the island on the water, so that I can add different islands or remove them all together.


Then I put some hills on the terrain. I wanted to mimic some cliffs (lower left of the photo), but that just isn't going to work very well here. I plan on putting sand down in certain locations indicating "safer" landing locations. I could also put out some "rocky" locations where no landings can take place.
 
Step #4 - Glue the mainland to the water.
 
Step #5 - Add roads and toss hills into the map to see how things fit.


Step #6 - Add a bridge (removable as I may want to be able to destroy it). Or it could be removed and that is the ferry spot.


Step #7 - Add other terrain gluing some and leaving others free to move around. You will be able to add hills and other terrain around edges and corners as those will be the areas most free of other glued on terrain.


Step #8 - Add a Beach? This turned out pretty cool so I may keep doing this. Beaches designate where larger amphibious invasions can happen tempered by campaign rules. I used Woodland Scenics "Fine Brown Ballast" for the beaches. You could dry brush them to make them lighter if needed. It would likely be much easier just to paint the beaches on the foam.


Ballast placed in small areas of glue to dry. This is the sloppy part. (Hey, did you notice I put a dock on the town in the harbor?!) Not sure the dock is something I like or not.


Beaches dusted off.


Rocky coast line and rugged mountains? I tried to add some bigger ballast to indicate "No-Go" zones on the craggy hill near the bay. Let me know if you like that look. Not sure I like it. Maybe if I dry brush it a bit grey. Notice the new trail and hill fortress on the heights.


The finished look


Added a small battery on the island to protect the harbor.


I still need to add forests and crops (I'm going to paint them on this time to see if it produces less warp). I do like using the foliage clusters for the forests, but if you wanted more flexibility you could get darker green foam sheets and cut out forest to lay on your maps.

Well, I'm very happy with how my first two boards turned out. In my next post I hope to have 4 to 6 boards done and can show you the mass effect. For a commando raid or a Viking raid I can see having just 1 or 2 these maps.

I will be thrilled if this inspires others to try their hand at making their own 3D maps.

Happy gaming
Eric

Friday, August 28, 2015

3D Campaign Maps - Part 2

Most of the feedback has been very positive for the 3D Campaign Maps, so I thought I would share a little more progress and setbacks in the prototype.

Painted Fields

First, here is the picture of the fields around the towns after I added 3 different paint schemes to the original green of the paper cut-out. I really love how these turned out.


Paints used


Pros: great visuals
Cons:
1. I think the fields are too big, but I may be wrong. I could get away with much smaller fields surrounding the towns.

2. The paper that I glued onto the foam has contracted, causing the edges of the foam to turn up near the fields. Uggh! Just look at this warp!


Solution: don't use the "field" paper, and just paint on the fields. I'll have more control over the layout that way too. Also, I will be adding another foam sheet under the terrain to give it more sturdiness and to allow for something special. You will get a glimpse of that in the next post.

Added Villages
You can see the light colored brown villages along the roads. I wanted them to look different than towns.


Comments welcome!
Eric

Tuesday, August 25, 2015

3D Campaign Maps?

I've been thinking about making 3D campaign maps for a while. I guess I don't have anything better to do! NOT!

Anyway, I made one sample map, which is 12" x 18", and is this craft store foam "paper".

I got mine at "Michael's".

http://www.michaels.com/creatology-foam-sheet-12x18/M10597609.html?dwvar_M10597609_color=White#q=Foam+Sheets&start=1


I really like the look, especially once I added the forests. Still playing around with the looks of the fields, and towns, but overall I'm pretty happy. I love how the forests look, but that is a lot more work. I could just go with different colored paper\foam, but it wouldn't look as cool. I'm going to add some small ballast for rocky grown just haven't gotten around to it.


I think I can use these maps for nearly any period of warfare. I could even cut out towns in shapes of castles if needed. Right now I'm gluing everything down for easy storage.

So, opinions? Should I continue? Do you like the color schemes? Is it worth it? Should I get back to painting miniatures?

UPDATE:
I got some great questions in the comments section so I'm going to add them here.

The maps will be geomorphic. As you can see there are two rows (4" in) on the long side of the sheet, and 1 road 6" in on the short side.

How did I make this prototype?

As mentioned, I bought the 12" x 18" craft foam sheets from Michael's (see link above).

I picked the best green one for the base. (I'm likely going to glue that one on to another sheet for stability).

I then cut out other colored sheets for the hill contours. I used lighter to darker shades as the hills rise. Two additional heights would be grey and white for snow. (You could also do a winter version of these maps, but you would likely need to do a lot a painting to make it look decent)

I then placed the hills on the base and moved them around until I could visualize the layout I wanted. You could easily sketch them out before hand, which I will do in the future.

Once I was happy with the hills locations I glued them down to the green base sheet. I guess you could just glue the hill portion together and not glue them to the sheet to add more flexibility to your layout, but I think I will glue all my terrain down for stability reasons. These are so cheap to make I could make 20 of them without blinking an eye.

After the hills were down, I cut out green "fields" and grey "towns" and glued them on to the green base. The fields were a special paper with small ridges in it, which should paint up nicely into crops. I'll post pictures later on how that turns out. I also placed some small village (light brown) on the maps which I will add photos of later. This makes the distance between towns not so far.

After all the foam pieces were glued and dried, I used a brown Sharpie (normal size, not fine) to draw the roads and trails (dashed lines). I was originally going to paint the roads, but the brown looks good enough and can pass for multiple time periods, including moderns.

Lastly the forests. These are shredded pieces of Woodland Scenics foliage clusters. I love how these turned out. I first painted the area I wanted to be woods with brown paint (forest floor), and then glued the clusters to the area painted brown. Simple. I did use Scenic Cement on the forests afterwards, but found that was not necessary. (I didn't put Scenic Cement on one of the forests and it turned out sturdy and fine).

Note, these maps show the MAJOR features of the terrain. When you go to battle you would have a battlefield "frame" (envision a empty picture frame), that you would lay on the map. You would then transfer the major features to your battlefield and add additional small features like farms, small hills, small woods, streams, etc.

Scale

Well, as the map looks now this would be a localized campaign lasting up to several months. As most of you know, larger campaigns are very tough to complete and having a small operational campaign may fit the bill nicely. The plan is to build around 20 of these, and the campaign would be fought across 9 to 12 sheets.

I can see this as great for any period of warfare:

Viking Raids (SAGA mini-campaign)
Hundred Years War
ECW
SYW
Napoleoncs
Modern

What's Next?

Adding rivers (yes geomorphic)
Adding shoreline
Adding rocking (ballast) terrain.

Any other suggestions?

Other Questions
 
Will you be mounting it and using push pins, or leaving it laid out and transferring encounters to your miniatures?
 
EB - The counters will just mark locations of soldiers. You would transfer to the gaming table using the Battlefield Frame I mentioned above. I'm not sure how the foam would handle push pins, but then you would need to mount it on cork or thicker foam. I'm sure it could be tested with some scrap foam pieces as you cut out the terrain.

What are you using for campaign rules?
 

EB - Not sure what I'm going to do first. As you can see from my blog I have run several campaigns using my own framework.

Have you considered either cutting the board into quarters and making them geomorphic?
 
EB - They will be geomorphic. I don't plan on cutting them into smaller pieces.
 
Will you do water features the same way?
 
EB - Yes, and I really think you will like the idea I have for them.

Are the roads inked in?
 
EB - Yes, with a brown Sharpie. Simple is sometimes the best.
 
Is each level of terrain independent and relocatable, or are your hills permanently attached?
 
EB - They are currently attached, but you could make them independent to begin with or create additional pieces that could be added to existing maps. This particular prototype map is very hilly.

Thanks,
Eric