Showing posts with label To the Strongest. Show all posts

Saturday, March 1, 2025

Gallic Wars - Battle of Sabis River - 57 BC

Good afternoon,

I'm running this game at Historicon in July so I thought I would do a dry run in preperation for the game(s). 

I had to scale back the forces as I only had 2 players, but the game at Historicon should handle 4 to 6 or 7 players.

As usual, click on the photos for a larger image.

Game Components

  • WoFun 18mm Caesar's Legions figures
  • Roman Marching Fort from Etsy Shop CenturianStudio. 
  • To the Strongest (TtS) rules
  • Homemade chits (rather than cards) for TtS.
  • Homemade trees and one-inch thick foamboard insulation for the minor hills.
  • Plains Mat from the Big Red Bat Shop (6' x 8') with 4" squares
  • River from Etsy Shop that appears to be gone for the moment.
  • Green Movement Trays off Thingaverse and 3D printed by my friend Steve.
  • I designed the labels to go on them so there is no roster needed for the game.
View from the Belgae side looking towards the unfinished Roman fort

Note: Since it was just me and Rob, I scaled back the table to 6' x 5' and removed about 1/3 of the forces. I hope to run the entire game at Historicon.

Background for the Battle

Wikipedia Link about the battle

Caesar is trying to put down a Belgae revolt led by the Nervii tribe. The Nervii have massed their forces and gather the Atrebates and Veromandui Belgae tribes as allies to fall upon the Romans on the River Sabis in 57 BC.

Here is the graphic layout for the entire battle that I created. Click for larger view.


The Forces

Two Roman Legions with Caesar ins support hold the center

Nervii tribe in front of the Roman Lines. Historicon game will have double this amount.

Veromandui tribe advances in the center

Atrebates tribe on the far right facing the mighty X Legion

The Sabis River valley

View from the Roman marching fort which is not used in the battle, but was being contructed when the Belgae attacked.

X Legion prepared for the onslaught with Labienus (detached leader) commanding this wing.

Great view of the entire battlefield.

The Battle

Atrebates javelin skirmish strike first disordering a Cohort from the X Legion!

Veromandui trying to soften up the IX Legion with javelins


Rob's Romans quickly filled in the gaps in their lines while the Belgae were a little more unorganized


The Nervii, led by their warlord Boduognatus (round stand), charge towards the Romans

Nervii skirmishers filter back through their lines to let the warriors charge the rightmost Roman Legion

The Atrebates and Veromandui warriors collide with the IX Legion (blue shields)

Note: the single small bases are used to denote disorder on the units. Romans take two disorders and are eliminated. The Gallic Deep warbands take 3 disorders before they are routed.

The Atrebates warriors clash with the X Legion (red shields)

One warband attempting to move around the flank of the X Legion


In the center the Romans drive back the Veromandui warriors across the river with multiple disorders.

The X Legion breaks the center of the Atrebates line! This was the beginning of the end of the Belgae.

Nervii's turn to be routed, with the Legion filling the gap

At this point the flexible Roman legions begin to turn and flank the Belgae warriors. Much slaughter ensues.

Atrebates disordered and flanked!


The slaughter of the Veromandui continues across the river Sabis! (two disorders)


One Nervii warband (center) had been stuck out of command behind the main force and finally marched to save their brothers. Hits the Romans in the flank! Too little, too late.


Romans in the camp witness the battle in the river valley!

The End

With six warbands wiped out (18 victory metals) and every other one damaged, the Belgae are forced from the field. The IX Roman legion lost three out of four cohorts, which is only 6 Victory Metals.


Victorious Rob with a huge victory smile


Other Games

I've been playing a lot of different games over the last couple weeks with friends and family. Over 40 games in January and February combined. Here are some of the latest games.

Conquistadors by Compass Games

This is another great game marred by poorly edited rules and lack of counter component design. However, I love the game so much I have created a new Player Aid, painted all the counters (after this set of photos) to clear show the difference between the factions, and then added Conquistador expedition markers in the faction colors for easy identification on the gorgeous game board.

Played with Rob and Daryl, with Daryl claiming victory in the end.

What a GREAT looking game. Love the mechanics too.

Here you can see the player mat created by a BGG fan.

Using this Wofun mini (18mm) as the new Impulse Marker.

Game in action, however you can't tell which Conquistador is yours very easily.

Using my WoFun 18mm Cortez Conquistador mini as the First Player marker.

Darwin's Journey. This is our newest "go to" Euro with tons of dynamic ways to win. We are playing it two more times this coming weekend.


Arkham Horror the Card Game. Played with Rob, Steve, and myself. Definitely a fun game and a different type of "RPG". We won the game, but it felt like there was a doom clock ticking in our ears. Steve used his 3D printer to pimp out the game.


Great War Commander by Hexasim. Played this with Bill K. Truly enjoy playing this game. This was scenario 19, a German attack against the Highlanders.


Have a great day! Goodbye from Oak Island!


Saturday, November 9, 2024

Roman Line Swap - Quincunx - for To the Strongest

Hi,

I have recently started using To the Strongest (TtS) for my 2nd Punic War armies (WoFun) and I didn't care for the line swapping rules that are in Even Stronger (errata, etc for TtS).

I have come up with the following rules to use in my Punic War games and thought I would share.

  • Each unit (Hastati, Principes, Triarii) is a REGULAR unit with 2 hits. (Not Deep)
  • Hastati Save on 7+, while Principes\ and Triarri save on 6+.
  • Hastati and Principes have Shock Missiles (single shot, no resupply)
  • Line Swap may be done in enemy Zone of Control.
  • This is a Special Rally attempt (not an activation) once per turn to swap units with a Rally Action on a 6+. If failed Special Rally, nothing happens. Play continues as normal.
  • 1st Successful Attempt - Principes replace the Hastati, then Triarii move to where the Principes were, then the Hastati move to the rear where the Triarii used to be located.
  • 2nd Successful Attempt – Triarii replace the Principes, then Hastati move to where the Triarii were, then the Principes move to the rear where the Hastati used to be located.
  • In addition, Velites may interpenetrate per normal TtS rules, but may also move for one activation from the front to completely behind the Triarii (or whichever unit is in the rear)
Here are some PowerPoint graphics illustrating what I mean by the Line Swap. These are all valid deployments in TtS for the Roman\Latin allied legions.

Example 1:


Example 2:


Example 3:


Thanks for looking

Eric

Tuesday, November 5, 2024

Painting the 3D Printed Roman Marching Camp

 As promised, here is the "how I painted my new fort" blog post.

Prior post: Din of Battle: 3D Printed Roman Marching Fort from CentrionStudio on Etsy

Direct link to CentrionStudio (they have a TON of other buildings and periods so if you are not into Romans, you can choose from a huge variety of terrain)

As usual, click on photos for larger views.

Tools

  • Paint brush that is large and can spread liquid well. Another for dry brushing and one last one for detailed painting.
  • Hardware File(s)
  • Exacto knife
  • Stedi Nippers - great for trimming flash and residue from models
  • Spray Paint - Krylon Camouflage Paint, Ultra Flat, Sand color, 11 oz. - K04295000 (took the entire can of paint to cover the entire fort)
  • Citadel Colour Shade (Agrax Earthshade)

One bottle got me through the entire process.


Prepping the Fort

First, wash in warm water and use a soft brush to "scrub" lightly the pieces to remove any residue.

Use nippers, exacto, and file to remove as much extra flash\filament as possible.

In addition, I snipped the tops of logs off the models so that I could fit my WoFun (30mm x 20mm) bases on the fort walkways. (Prior post discussed this).

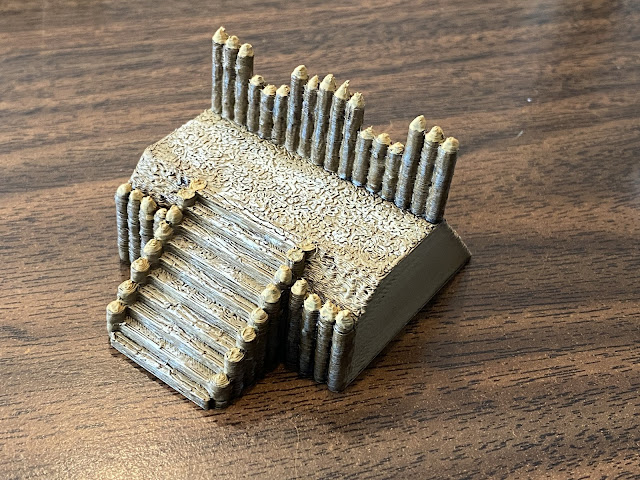
I wanted to have the weapon's platform section have no log "tops" so that it was flat for whatever size weapon stand I put on it. I like how it turned out.

Before (just primed with spray paint)


After (log tops removed so the platform is flat)


I also snipped the middle poll support for the large entrance, as I wasn't able to put a stand in the tower section without removing it. Glad I did that before I glued on the top tower section.

Lastly, I primed the entire model\sections with the Sand color spray paint. This allows the Shade to be washed on and pop out the details. You can see the grey un-primed tower parts to the top right.


Painting\Washing

I have never used the Shade from Citadel before but had bought it about a year ago to edge my WoFun figures, which I never got around to do. So, this was my first experiment and I LOVED using this product.

I did one wash across the entire set. 

Then I did a second wash on just the logs and wood poles, doors, and towers. This turned out perfect as I was struggling to find a color I would like for the logs. This photo gives you an idea of the color process.


1 = primed, 2 = one wash, 3 = second wash on just the wooden bits.

Main large entrance with some Roman guards. (Gate is missing as I try to figure out how best to attach them)


Adding Paint Details

At this point, the fort is completely usable, but I wanted to cap each cut log with lighter shades of tan\brown and dry brush some worn paths on the battlements and towers. This also allowed me to go back and snip out the fibers that I missed in the first go around.

For the cut log color, I used FolkArt 419 "Teddy Bear Tan" as the color. It pops well, especially when dried. For the tread worn paths I dry-brushed with Americana "Antique White". I like how it turned out.


Lastly, I dry brushed a neutral grey (American Neutral Grey) to blend in the logs and add more contrast then used Krylon Matte Finish to coat the fortress.

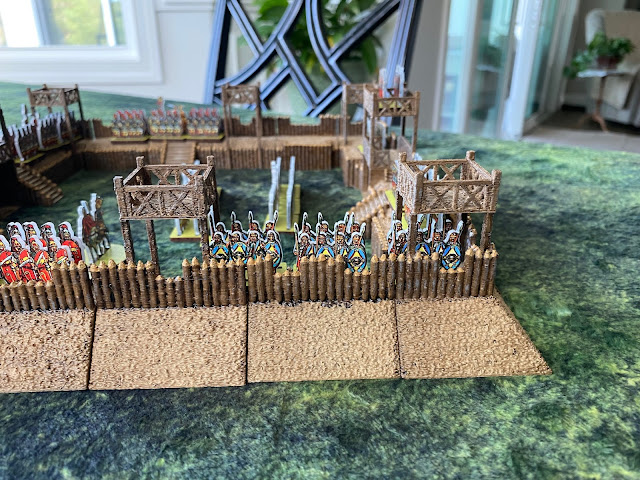
Finished product with Legions and Gallic Warriors

Here is the final product with the Romans manning the fort while the nasty Gauls are thundering around the outside ready for their assault! I chose to only add one tower to the corner sections instead of two levels high. This is because my fort will be used for battles rather than skirmishes and allows me to store it all in one box easier.


I have tiny rare earth magnets arriving soon which I intend to embed into each section, so they snap together and hopefully stay together during game play.

Now I need a Gallic Hill fort, and villages. I have an idea for villages, but still searching for a good Hill fort in 15mm. May just have to make one as they are quite simple in design.

Have a fantastic day!

Eric

PS - A little inspiration arrived this week too! The Landmark Julius Caesar which I didn't even know existed until last week!