As I am moving to a new home by the end of the year, I wanted to break out my unfinished trench system terrain boards which have not been used for a game, nor are they completed. Screw it! I want to play on them!
I'm going to use Great War Spearhead 2 rules (our first try with these rules in a trench system). GWSH2 is a popular and well-supported WWI ruleset for 15mm and smaller scale battles. This is not for skirmishing. You can pick up GWSH2 and their fantastic scenario books on Lulu.
The battle played out over two nights. First night, late start as the French\Germans had to do planning before we could truly begin. We played two hours after that and got in all the preliminary bombardment (3 days) and 3 turns. We then finished (or nearly finished) on the second night and got through 5 more turns. This is a long battle report and I hope you make it the end!
Some shots of the terrain before it got destroyed by artillery. :-)
Below, the view from the German side of the table. As usual, click to get larger images. Right click and open in new tab to get largest version of the image.
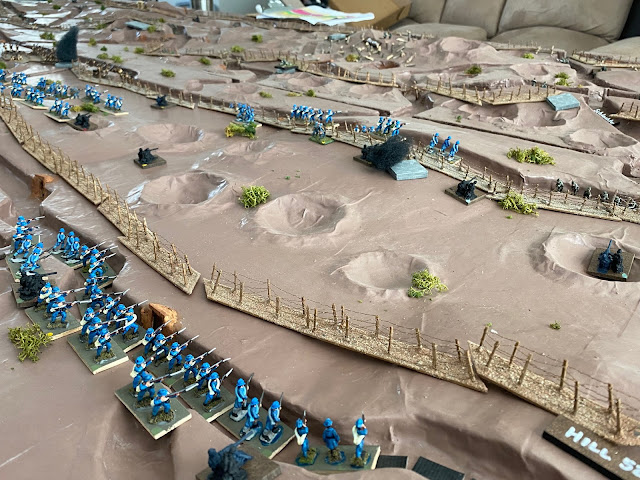
Lower angle to show some depth of the terrain. I really love having trenches dug into the terrain. It looks so amazing.
Below, French trench line on the left, and three German trench lines to the right.
French left flank, with German trenches and pillboxes\bunkers in place.
French Right flank.
French Order of Battle
The French had 8 Regiments of infantry\MGs, plus an enormous amount of artillery. Roughly 2 Divisions. Yes, the regiment names are incorrect. I found the right ones, but that was after the battle.
German Order of Battle
Germans had one Division with 3 Regiments (Infantry, MGs, and Minenwerfen). Plus they had one battalion of stosstruppen. (one company was armed with flamethrowers).
French and German Planning Maps
I made this planning maps for both the French and Germans so that they could devise their preliminary bombardment (French only) and then their pre-planned indirect fire during the game.
Due to me being unclear, the French didn't understand that they had to do pre-planned indirect fire, but took about 30 minutes on game night to map out five turns of it. Germans mapped out 3 turns of pre-planned fire. (Next time, they will both likely due about 8 to 10 turns of pre-planned fire)
There are nine zones for the French to bombard. Left, center and right and the Forward, Battle, and Reserve trench zones. More below.
Below was the color coded map sent out showing the zones.
I won't lie. This is a LOT of work for the game master too.
The Preliminary Bombardment
There is a HUGE learning curve for first time players (both sides in this case) with regards to plotting artillery fire in a trench game. I thought Phil, overall French commander, did a pretty good job of this considering he has never fought a trench battle before.
The French plan was to bombard the trenches for three days targeting all sectors for wire destruction, while attempting to shatter the bunkers and pillboxes. Due to sighting distances, the damage to the pillboxes and bunkers were not immediately known to the French.
The artillery regiments needed a 6 on a D6 to destroy they wire and they only got 4 hits out of 33 tries. We have a fascinating discussion on the GWSH2 GroupsIO forum about this right now. I will be changing my games to destroy wire on a 5 or 6 in future games.
The Battle
Six of the eight French infantry regiments went over the top on Z-hour.
Below you can see the French pre-planned artillery striking the pillboxes and bunkers (they had German MGs in them). They wouldn't learn the fate of the artillery strikes until they got closer to the pillboxes.
Several "French" Regiments move to the assault. Yes, I don't have enough French, so I had to use USA troops as proxies.
Here you can see the Germans coming out of their dugouts, while the French rush across No-Man's-Land (NML).
Turn 1's French indirect fire laid smoke and blasted all the pillboxes across the entire front! Indirect Fire comes after both sides move.
View of the French massed infantry assault.
After two moves most of the French get stuck trying to cross the uncut barbed wire.
The view from the German perspective is a bit overwhelming!
Turn 2's Pre-planned artillery fire once again lay smoke and blast bunkers and pillboxes. German preplanned artillery fire caught many a young Frenchmen in shrapnel and high explosive whirlwinds!
Below: German Company A of the 117th Regiment is about to write their story into legend! This lone stand would fight 4 more turns and hold up an entire French regiment as it destroyed or beat back every attack that came its way!!
French breaching the wire in force!
The German first trench was very lightly held, but they fought like lions. The black cube behind one of the USA infantry stands means that unit is suppressed. You can rally from suppression at the end of each turn.
French generals contemplate the situation. Green cubes mark Germans in "ambush" mode. All three pillboxes in the first German trench line were destroyed by French artillery.
Below are a series of photos at the end of Turn 3 (end of the first night of game play). Here you can see that the first trench line has been breached by the French in several locations.
The next morning I wanted to take some photos in daylight and this is what you see below.
This Elite German MG in the pillbox has a lot of targets coming towards them.
Another French Regiment has arrive in the first French trench line to follow on in support of the attack.
Turn 4 has begun! I have kinda lost track of the turns at this point. I'll comment on them, but without turn references. The next series of photos until the end cover turn 4 through 8.
Entire table showing costly advances by the French on their right flank. Eventually 3 French regiments would break across the front. Two of them in the far right sector.
View from the German right wing perspective (117th Regimental area).
The ground between the first and second German trench was considered ROUGH ground due to bombardment. This means all infantry moves 1/2 speed, and if they want to fire they have to move 1/4 speed. The French advance with all speed towards the German lines.
Action in the center shows all German resistance in the first trench overrun.
German frontline companies of the 117th regiment are being overwhelmed.
Below: Stosstruppen companies move into the center to reinforce the local companies. Brown cubs mark units that move and can't fire. That big artillery blast was friendly fire from the Germans! It crushed the two French stands, but also wiped out one of the Stosstruppen companies!!
Company A of the 117th German regiment has been tearing huge chunks out of French companies and sending to their grave. Below you can see their location and how the entire French Regiment is now swarming the first trench line. The German commander decides to fire with the two MGs in the intact German bunker on HILL 540. They want to help the heroic A Company!
Meanwhile in the center three French Regiments advance towards the 2nd German trench system. The 76mm German Minenwerfer opens up direct fire on the French with devastating results, but there are just too many French!
View of Company A from the French perspective. This is the third assault against valiant company A!
Center of the line with the German Stosstruppen battalion moving into the breach. Many vicious close assaults ensue.
German bunker on HILL 601 in the center of the table is now within spotting distance of the advancing French! What will they see?
French pre-planned artillery (Super-heavy and heavy) smashing into the German Bunker on HILL 540.
Two direct hits end the life of bunker on HILL 540! French casualties will be lessened due to this lucky salvo!
Back to the center, the Germans reveal that the bunker on HILL 601 has survived all bombardments and has two German MGs laying in wait!
Having no choice as the German MGs will just slaughter their companies, the French launch into assaults against the bunker in the center of the table.
In conjunction, they storm the trenches to the left of the bunker (HILL 601)
French push in the center too.
4 of my five generals on the second night.
A little action from the perspective of the troops. this will look amazing when I get it terrained with dirt and sandbags.
The infamous Company A 117th, after destroying another infantry company, suppresses the French MG (which doesn't rally at the end of the turn), so they assault the MG and wipe it out! Heroes of the Fatherland!
A view from the center to the French right, German left. I didn't get a lot of photos from the French right as we had a lot of folks in the room and I could move over there to take photos.
The trenches are empty of Germans?! The 117th failed morale and all stands are removed from the table per the rules. Even the invincible A Company! (They escaped intact)
Push in the center.
French right has reached the 2nd trench line and assaults and close range fire erupts.
French assault and destroy the MGs in the bunker! Great day for the French! Heading for the 3rd line.
Zoomed back out for an aerial recon view of the ferocious fighting in the BATTLE ZONE.
At this point it was past 10pm on a weekday so we called the battle. The French did reach, and in some places, took control of the 2nd trench system. The French lost 3 regiments to one German, but the weight of casualties was piling up for both sides. I would think another 3 turns would have decided it one way or another.
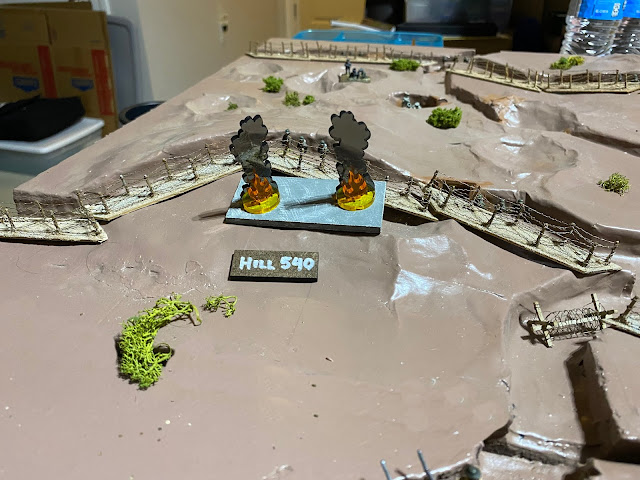
Below is a daylight (following morning photo) of the German far right bunker burning.
So, we called the game the night before, but I wanted to show the flamethrower stand I have made for the Stosstruppen. They sadly needed one more turn to get into action. You can also see at the bottom of the photo my prototype sandbags which will line all the trenches and gun pits.
Overall an outstanding game and definitely a hit with the Charlotte Garrison. I'm hoping to get one more trench assault in before I move to my new home away from Charlotte.
Eric


Eric
ReplyDeleteFabulous show... good work!!! I enjoyed your account. I prefer this style of AAR to those that involve dense text.. a comment on my short attention span LOL
Robin
A great looking game and great report!
ReplyDeleteThank you very much
Wow.
ReplyDeleteEven with the unfinished terrain it's looking impressive.
Can't wait to see the board finished.
What a marvellous game/representation and report. Fabulous to see the Western Front done on such a large scale.
ReplyDeleteRegards, James
This looks great Eric! The terrain board is awesome!
ReplyDeleteThat terrain board looks awesome!
ReplyDelete