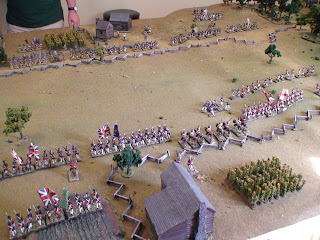
About two weeks ago, Bob McCaskill hosted a Guns of Liberty game that I ran for the local lads.
The game was an introduction for most of the players as only a few had played my rules before.
We were playtesting some minor 3.0 version tweaks to the rules and just had a great time.
The British were on the attack in this fictional Southern Campaign battle. Bob has a spectacular collection of 25mm AWI figures with GMB flags.
The Battle of McCaskill's Farm
Deployment
The battlefield was broken into two fighting locations, with a large wood covered ridge in between the two sections. Players could move units, via trails, through the woods to the other side to help if they deemed it worthwhile. The British are favored to win in this battle, and the American's goal is to bloody the British before withdrawing.
British OOB
I've posted graphics of the Guns of Liberty rosters for those familiar and not familiar with the rules to see how unit ratings are done.
Left Flank (click to enlarge) - Joe commanded the 1st Brigade, and Jim the 2nd Brigade.

Right Flank (click to enlarge) - Royalist Brigade commanded by Dr. Bob.
American OOB
American Left Flank (facing the Royalist Brigade) - Commanded by Mike
American Right Flank - 1st Brigade lead by Leo and 2nd Brigade by Tim.
View from the British Right Flank
View from the British Left Flank
Great shot of De Lancey's regiment with the NC Royalists to their right
33rd Foot advancing
Delaware Regiment (3 stands) awaiting the British attack as a reserve unit
Initial Attack
The British plan was simple, advance on all fronts and punish the American rebels!
The British players deployed their units in Open Order line formation for the attack, with the converged Lights pushing forward on the right in skirmish formation.
View of the British attack on the left flank
View of the Royalist Brigade, Queen's Rangers deployed in skirmish on the right to counter the American riflemen behind the fence.
The American Left flank showing the rifles far left of the line on the fence and Lee's Legion Light infantry on the far right in skirmish formation. The rest fo the militia was held in reserve.
In the middle Joe's brigade of Grenadiers, Lights, and the 33rd advance forward, while Leo's bridage, moves to meet them.
Tim's American bridage "advances to the rear" to gain cover of the rail fence and await the assault by Jim's 2nd Brigade and the dreaded 1/71st Highlanders.
The Royalist Brigade screened on their right by the Queen's Rangers drives the rebels backwards.
Just before the point of impact
Meanwhile on the British left flank the 1st Brigade smashes into the Continentals (North Carolinians, and Marylanders).
In the thick of it! Love thos GMB flags!
British Lights had fallen back after drawing the Continental's first, and most effective, volley. Then the Grenadiers and 33rd are sent in to finish off the Americans
De Lancey's regiment drives Lee's light infantry back
Queen's Rangers form into Open Order and charge the riflemen! The riflemen are forced to retire and the rangers take the ground.
American light infantry in skirmish formation try to inflict some casualties on the large Highland regiment. They are not very successful.
The small 1st Delaware Regiment is forced to retreat by effective British musket fire.
Good view of the action across the entire right flank of the American line.
Another view
Dr. Bob's Royalist Brigade continues to punish the rabble driving them back from the fence line.
Leo's Continentals give the British a taste of their own medicine and this turns into a see-saw battle with muskets blazing!
NC Royalist regiment clears the fence and steam-rolls into the North Carolina and Virginia milita.
The Royalist Brigade is now completely engaged!
And victorious! The militia are routing, the American 3# guns are silenced, and this flank is well in hand.
British 63rd Foot overruns the American guns! Disaster for the Americans!
Dr. Bob, knowing his section of the battlefield was secure, sends Tarleton's Legion through the woods to attack Leo's left flank. This was the end for the Americans.
Well, the Americans were routing on their left flank and had to withdraw on the right after taking a pretty heavy beating along with Tarleton riding down their flank and then pursuing. It would be a hazardous retreat for the Americans.
We had a really good time and kudos to Dr. Bob for hosting the game and I thought he played the game extremely well.
Cheers!


Fantastic photo's!!!
ReplyDeleteGreat looking battlefield!! AWI is just such a wonderful period and you really captured the atmosphere.
ReplyDeleteChristopher
great battle report - I'm very impressed with the terrain and mini's
ReplyDeletemust resist urge to do AWI, wife will kill.....
Very tempting!
Fantastic battle and photos!!!
ReplyDeleteCheers
paul
Appears your Charlotte garrison domain link is broken did you all lose your domain name?
ReplyDeleteYes, I gave up the Domain name. No reason to keep it any longer.
ReplyDeleteHey, Eric, where be the 3rd edition, young man. It be 2017 now!
ReplyDelete