Well, this is something unexpected!
My friend, Eric C., has a 10mm WW2 North Africa collection of British (Commonwealth), German, and Italians forces! He has assembled enough for us to play the BATTLEAXE CAMPAIGN of the summer of 1941.

I'm the overall Axis Commander, while Brian is the overall British commander. We are both remote commanders while all the field generals are back in Charlotte, NC where the battles are fought.

Turns are 8 hours each, with two daylight turns and one night turn a day. The campaign is only three days long.
The Germans can only fight on the first turn and will start being able to react on the 2nd turn. This has me in a flux as I'm itching to counterattack those bloody Brits!
The first turn saw two battles (see below) and a third battle just starting at the beginning of the 2nd turn in Halfaya Pass.
I'll post my planning and strategic maps after the campaign so you can follow along as to what I'm seeing. Battle reports are written by the umpire, EC. The tactical battles are fought with Blitzkrieg Commander IV.
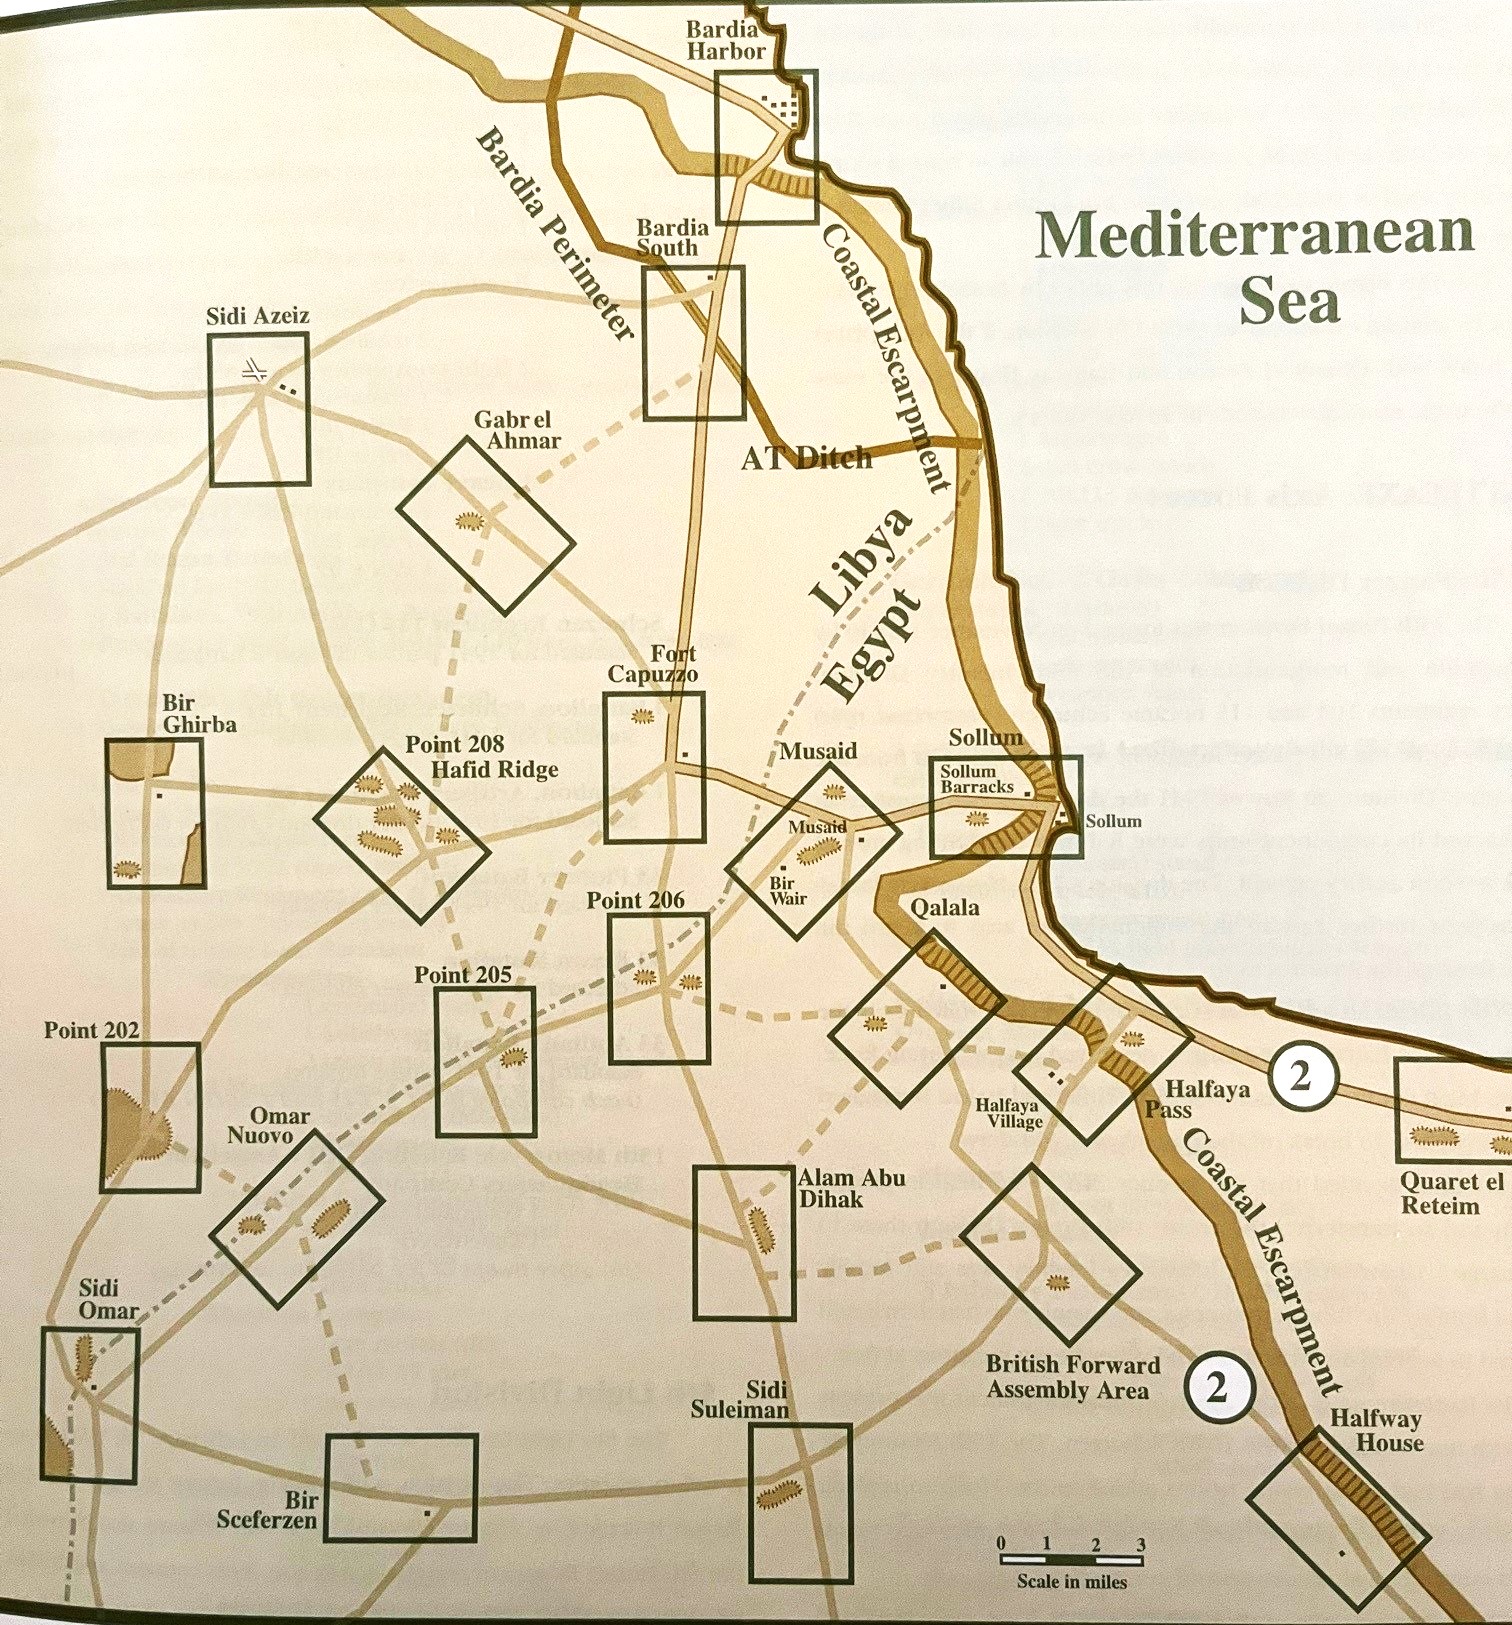
Campaign Map

Battle of Point 206
8
am- Point 206: As the leading company of the 6th RTR came onto
the field, they could see that a force of Italian infantry had entrenched
themselves on two hills on either side of the road leading North to Fort
Capuzzo. The defensive line was strengthened by 3 gun emplacements
containing Italian 75mm artillery. Wasting no time, the Crusader tanks of
the 6th RTR turned north and engaged the infantry manning the
closest trenches, doing little damage but managing to suppress an infantry
platoon. The close support tank platoon attempted to fire smoke shells to
mask the closest 75 mm battle, but the shells sailed over the hill. For
their part, the closest two Italian guns managed to get a few shots off at the
tanks, which saved several of the hits and suffered little damages.
Surprisingly, the 33rd Recon forces turned around and drove back
along the road they had just retreated along, unlimbering a 37mm AT gun near
the crossroads to shore up the middle of the Italian line. The 33rd
Recon will make its presence felt.

8:30
am: The Crusaders crept to within close range of the Italian trenches and
their concentrated fire began to have an effect, destroying one entrenched
platoon and suppressing another. However, the Italian recon platoon on
the hill was able to effectively coordinate with the closest HQ, and the
Italian guns, along with the DAK 37mm, were able to suppress several
Crusaders. The British close support tank attempted once again to fire
smoke shells but missed again. A company of Crusaders began to edge
along the Italian right flank towards a gap in the frontier wire.
9:00
am: The concentrated fire of two Crusader companies suppresses another
Italian entrenched unit, which decided to pull back. The third Crusader
company continues to creep along the Italian right flank, suppressing one of
the two (dug-in, but not entrenched) infantry platoons blocking it.
To their surprise, however, an Italian 47 mm anti-tank gun appears on the brow
of a low hill in front of them and begins to engage. The close support
tank once again attempts to fire smoke and misses, and in frustration begins to
engage the Italian gun positions with HE rounds. As all of this is going
on, the British 2nd Battalion of the Rifle Brigade arrives on the
field and moves quickly due east with the apparent intent of engaging the
center and left flank of the Italian line. However, several trucks burst
into flames when they are taken under fire by a German 75 mm gun belonging to
the 33rd Recon, which has now unlimbered next to the 37mm gun.
Two platoons of British infantry are lost. The Italian and German guns
keep up their fire at the Crusaders and manage to suppress a few.


9:30 am: The close support tank finally manages to land some smoke rounds on target and masks the Italian 47mm AT gun that has suddenly appeared ahead of the 3rd company of tanks. The 3rd company takes advantage and destroys one of the two infantry platoons ahead of it and continues to creep along, suppressing the remaining platoon. The other tanks destroy the fleeing Italian infantry and attempt unsuccessfully to suppress the Italian guns. The 2nd Rifle battalion splits into two formations and moves steadily east. The leading formation unknowingly moves to the edge of a hidden minefield, but it would never move closer to the Italian lines. At that moment, the two supporting batteries of Italian artillery at Fort Capuzzo finally fire missions and pulverize the leading five stands of British infantry, eliminating two and suppressing two more. The Italian artillery and mortar on the Eastern flank and the German 75 mm gun in the center join in, eliminating another platoon and suppressing others. The 2nd Battalion of the Rifle Brigade has just suffered staggering casualties and begins to rapidly withdraw. To make matters worse, the Italian gun on top of the hill nearest the British is able to activate twice with one order, and single-handedly knocks out a Crusader at close range. Not to be outdone, another Italian gun and the German 37mm achieve flank shots on another Crusader and knock it out as well. Pillars of dark smoke are now drifting over the western part of the battlefield.

10 am: The Crusader tanks facing the Italians on the hill react to the sudden destruction of their comrades by close assaulting the Italian gun emplacement on the ridge line with two platoons while others drive past into the rear of the Italian lines. Despite the significant protection offered by the gun emplacement, the Italian artillery is overwhelmed and the two victorious British tanks overrun the Italian recon infantry for good measure. The 3rd company destroys the remaining Italian infantry in front of it and then two of the three platoons begin making a wide arc into the Axis rear while one engages the Italian 47mm AT gun. The close support tank once again fires smoke shells and misses. The crews begin hurling insults at the gunners. The German 37 mm gun limbers up and begins to move to a better firing position as its line of sight is now blocked, while the 75 mm howitzer continues to fire at British Infantry, although now the range is much greater. Another Commonwealth formation – this time a Jock Column from the 7th Support Group – arrives. Its 25 pounder guns immediately unlimber and begin firing, while the remainder of its forces begin to follow the Crusaders around the now open Italian right flank.

10:30am – Recognizing that it is time to leave, both the Italians and Germans attempt
to limber up and escape. Surprisingly, the 33rd Recon fails
its command roll and mills around in confusion, while the Italians only manage
to load a few infantry stands, a gun and the mortar before the rest are
overwhelmed and surrender to the British tanks encircling them. A few
German armored cars and Italian trucks containing the remnants of the Axis
forces speed down the track towards Fort Capuzzo. The British managed to
clear the map and capture or destroy a significant number of Axis forces, but
at a heavy cost. As a shell-shocked Brigadier Ware stated, “You say that
I won, but it doesn’t feel like it.”


6th Royal Tank Regiment Badge!

Battle of Musaid
(or the "Musaid Massacre" as it has become known to the British High Command)
The leading elements of the 22nd Guards Brigade began arriving on the battlefield shortly after 8:30am. First in line were the 2nd Coldstream Guards, who prudently dismounted from their trucks before moving onto the field. They didn’t move very far on their first turn, and DIDN’T MOVE AT ALL on their second turn, which is properly marked up to sheer bad luck. However, the question on each man’s mind must have been “where the bloody hell is our armor.” In the meantime, the emplaced German artillery and machine guns began steady process of thinning and suppressing the British ranks.
Although the FO was unable to
call in any (effective) artillery the first 2 rounds, British casualties began
to mount as the Coldstreamers divided into two groups and tried to reach
cover. On the 3rd turn (9:30), the second British regiment
failed to arrive and the British artillery failed to fire a mission.
However, the Brits made 4 command rolls in a row and managed to scamper to
cover. The Jerries kept up the fire. A 150mm Infantry Gun section
firing indirectly from behind the ridgeline was doing exceptional work.
However, the German off-board artillery rolled their first blunder and lowered
the CV of the FO for the next turn. At 10 am the Scots Guards arrived and
roared down the British left flank getting halfway across the board.
However, they boldly (?????) remained mounted. The British artillery
fired two missions and shocked the Germans with its power, destroying two
infantry units and some trucks. Although the Jerry off-board artillery
rolled yet another blunder and shelled one of their own units, the rest of the
Axis forces kept up the fire and made it count. British Casualties kept
mounting. At 10:30 the third British Regiment (Buffs) arrived and charged
for the emplaced guns on the hill in their trucks. Probably not a good
idea. Where were the tanks? Instead of firing smoke the British
artillery fired another impressive salvo, but due to the field fortifications
the Jerries (narrowly) only lost two trucks and no command stands were
disrupted. After another turn of Axis firing the British withdrew as fast
as they could. All three British units suffered serious casualties, and
the Scots Guards are no longer an effective independent unit.
Musaid is the last battle of Turn 1. I need for both sides to confer internally and issue orders for Turn 2. Hostilities will commence at Halfaya immediately featuring an epic slugfest between Jan and Mac. I’m excited about merely building this battlefield, let alone everything else.
From Brian (British overall commander) "I now understand how Wavell felt."
1. The British arrive and start taking hits.

2. The view from the ridgeline.

3. Mein Gott! What the hell was that? German artillery lands on their own troops!!

4. The charge of the Scots Guards.

5. Axis MVP: 150 mm Infantry Gun.

6. Everybody in.

7. This might hurt.

Hope you enjoyed and I can't wait to continue on with the campaign. Big thanks to EC for running this campaign, which allows me to actually participate in the campaign rather than running it!
Merry Christmas and Happy New Year!!
Eric

Exciting stuff! Looking foward to reading the updates. Good luck!
ReplyDeleteAh the Command Decision 3 Battleaxe campaign! Always one I wanted to refight.
ReplyDeleteNeil
Great eye Neil! You spotted the CD3 map! I really like that style of campaign map
DeleteWow, superb units on a gorgeous and immersive terrain, a pleasure to watch!
ReplyDelete